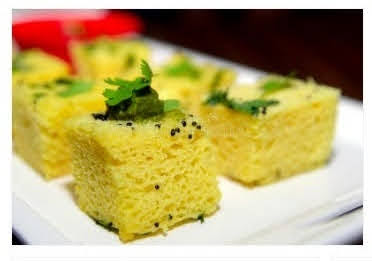
Khaman dhokla is a traditional Gujarati dish made with besan or chickpea flour. It is soft, fluffy and is a perfect breakfast or snack. Mildly sweet and tangy, it hits the perfect balanced taste like in most Gujarati dishes. They are gluten-free, so no need to worry about your diet. You can use vegan yoghurt too if you prefer vegan food. Very easy to make and so delicious!

I personally love Gujarati cuisine and culture. Vibrant and lively, the state is a hub of shopping, bright lehnga-cholis and mouth-watering food. Right from khaman, khandvi, jalebi-phapda to undiyo, every time I try a new gujju dish, it simply blows my mind!
In this recipe, I will share methods on how to make khaman dhokla by traditional fermenting method as well as the instant method. The only difference between the 2 is that the traditional method needs some time to ferment so it gets a nice tangy flavour, while the instant one might not be as flavourful but still soft and springy.... You need to have some time on your hand if you are cooking the traditional one.
You can also check out these other recipes you might like:
So here is the recipe for khaman dhokla:
Preparation time: 10 minutes
Cooking time: 20 minutes
Serves: 4
For the dhokla:


2 cups of besan(chickpea flour)
1 cup of fresh yoghurt(curd)
1/2 inch ginger, peeled
2 green chillies
salt as per taste
1 teaspoon baking soda
water as needed
Eno- 1 packet(for the instant one)
For tempering:
2-3 tablespoons of oil
1 teaspoon mustard seeds
1 green chilli
a few curry leaves
a pinch of asafoetida
1 cup water
1 tablespoon sugar
Instructions:
- In a bowl, take 2 cups of chickpea flour and add 3/4th of the curd to it.
- Note: Try not to use very sour curd because we are going to let it ferment for some time. Fresh curd works best here.
- Mix well with a whisk. Make sure to whisk it in one direction only to prevent lumps from forming. If the mixture becomes too thick, add about 1/4 cup of water. The batter should neither be too thick or watery.
- Place this batter aside in a warm place for 4-5 hours or overnight. Do not place it in direct sunlight or the curd will ferment too much and you will end up with very sour dhoklas.
- After 4-5 hours(or overnight), the batter will have fermented and risen up a bit. Take a spoon or spatula and give it a little mix. Do not mix too vigorously to deflate the air that has entered the batter. Just one or two whisks will do. Set it aside.
- In a blender, take the ginger, chillies and the rest 1/4 of the curd. Blend it well so that your dhokla doesn't have any pieces or stringy mess. Add the blended chilli and ginger to your dhokla mixture and mix well. Alternatively, you could also use some ginger paste. But I prefer making my own since I can control its spice and other factors.
- If the batter seems too thick, add some water to it. But the ginger-chilli-curd mixture should thin it out a little. If the batter becomes too thin, then your dhokla will be soft and springy on top but have a very hard dense base.
- In a pressure cooker, take about 1.5 to 2 cups of water and put a small stand on it. (the kind of stand you use to cook rice). If you don't have a stand, you could take about 1 cup of water. Place the cooker on the stove and turn up the flame to maximum.
- We are going to cook the dhokla in a flat bottom vessel, so take about a spoonful of oil and coat the bottom and sides of the pan well.

- This is the pan I used. It is about 6 inches in diameter and 2.5 inches deep. Oil it well and set it aside.
- Add the teaspoon of baking soda to your batter and mix well. Sprinkle the soda so it doesn't form lumps. Mix well and pour it into the container.
- Place the container in the cooker, close it and take the weight off the lid(like we do for making idlis).
- Steam the dhoklas for 20 minutes on medium flame.
- while they are steaming, you can prepare the tempering for them. It is best to let it cool before you douse your dhoklas in it.
- Pro tip: Arrange mustard seeds, curry leaves and everything needed to temper on a plate beforehand. It is easier to temper and you don't end up burning your mustard seeds!
- In a small pan, take about 3 tablespoons of oil and heat it up. Add a pinch of asafoetida and the mustard seeds. Let them pop for some time.
- Once the seeds are done popping, add the curry leaves and slit the green chilli into 2 and add it to the tempering.
- turn off the flame, add a cup of water and a tablespoon of sugar. Most restaurants and sweet shops use sugar in their tempering but it isn't hard and fast, you can skip it if you like. Let it cool down a little.
- Once the dhokla is done, take it out of the cooker and check for doneness. Insert a toothpick in the middle. If it comes out clean, then it is done.

- Run a knife down the edge of the container and flip the dhokla on a plate. With a spoon, sprinkle the tempering all over the dhokla well. Initially, it might look like a lot, but trust me, it needs that much. If you feel doubtful, you can stop after half the tempering and cut the dhokla into 1-inch pieces. Check the pieces for how much more tempering you need and add more accordingly.


You can garnish it with some coriander, coconut or even finely chopped chillis. there is no hard and fast rule as to how one should garnish their dhokla. My garnish always falls off my dhokla when I eat it and later no one wants to eat plain shredded coconut so I usually avoid it, but you can go ahead and add whatever you like! You can make Mint Chutney along with it too. Just skip the peanuts and add more chillis for the restaurant-style flavour.
For the instant version, skip steps 4 and 5 and instead of baking soda, add about 1 teaspoon of now. Baking soda also works fine. Follow through the rest of the procedure in the same way.

And there it is, your khaman dhokla! Let me know in the comments how it turned out and do subscribe to my blog for updates on new recipes!
~Meghana
Comments
Post a Comment